What is a Stitch? — Objects, presets and parameters
What does StitchPencil mean by a “Stitch”?
Section titled “What does StitchPencil mean by a “Stitch”?”A Stitch is StitchPencil’s basic unit of embroidery: one drawn object plus the recipe that turns it into actual machine stitches. Every Stitch has a kind — Run, Satin, or Fill (Tatami) — and a set of parameters specific to that kind (length, width, density, angle…). The kind determines which parameters exist; the parameters determine exactly how the needle moves.
Two related but distinct things share the name “Stitch” in the app, and it’s worth keeping them apart:
- A preset is a named, reusable Stitch — “Running Stitch,” “Satin 2 mm,” “Tatami 45°” — stored in your Stitch Library. Presets are what the tool rail’s quick-access tiles remember.
- An object is one specific Stitch you’ve actually drawn on the canvas. It starts from a preset’s parameters at the moment you draw it, but from then on it’s independent — editing the object later never changes the preset it came from, and editing the preset later never reaches back to touch objects you already drew with it.
How do I create a Stitch object?
Section titled “How do I create a Stitch object?”Pick a tool on the rail — Run, Satin, or Fill — and draw: a stroke for Run or Satin, a closed shape for Fill (or use Shapes / Text to place a ready-made one). StitchPencil’s engine generates the actual stitch plan live as you draw, using whichever preset is currently active on that tool’s rail tile. Points is a fourth way in — precision node-by-node placement instead of a freehand stroke, for the same three kinds.
How do I change a Stitch’s settings after it’s already drawn?
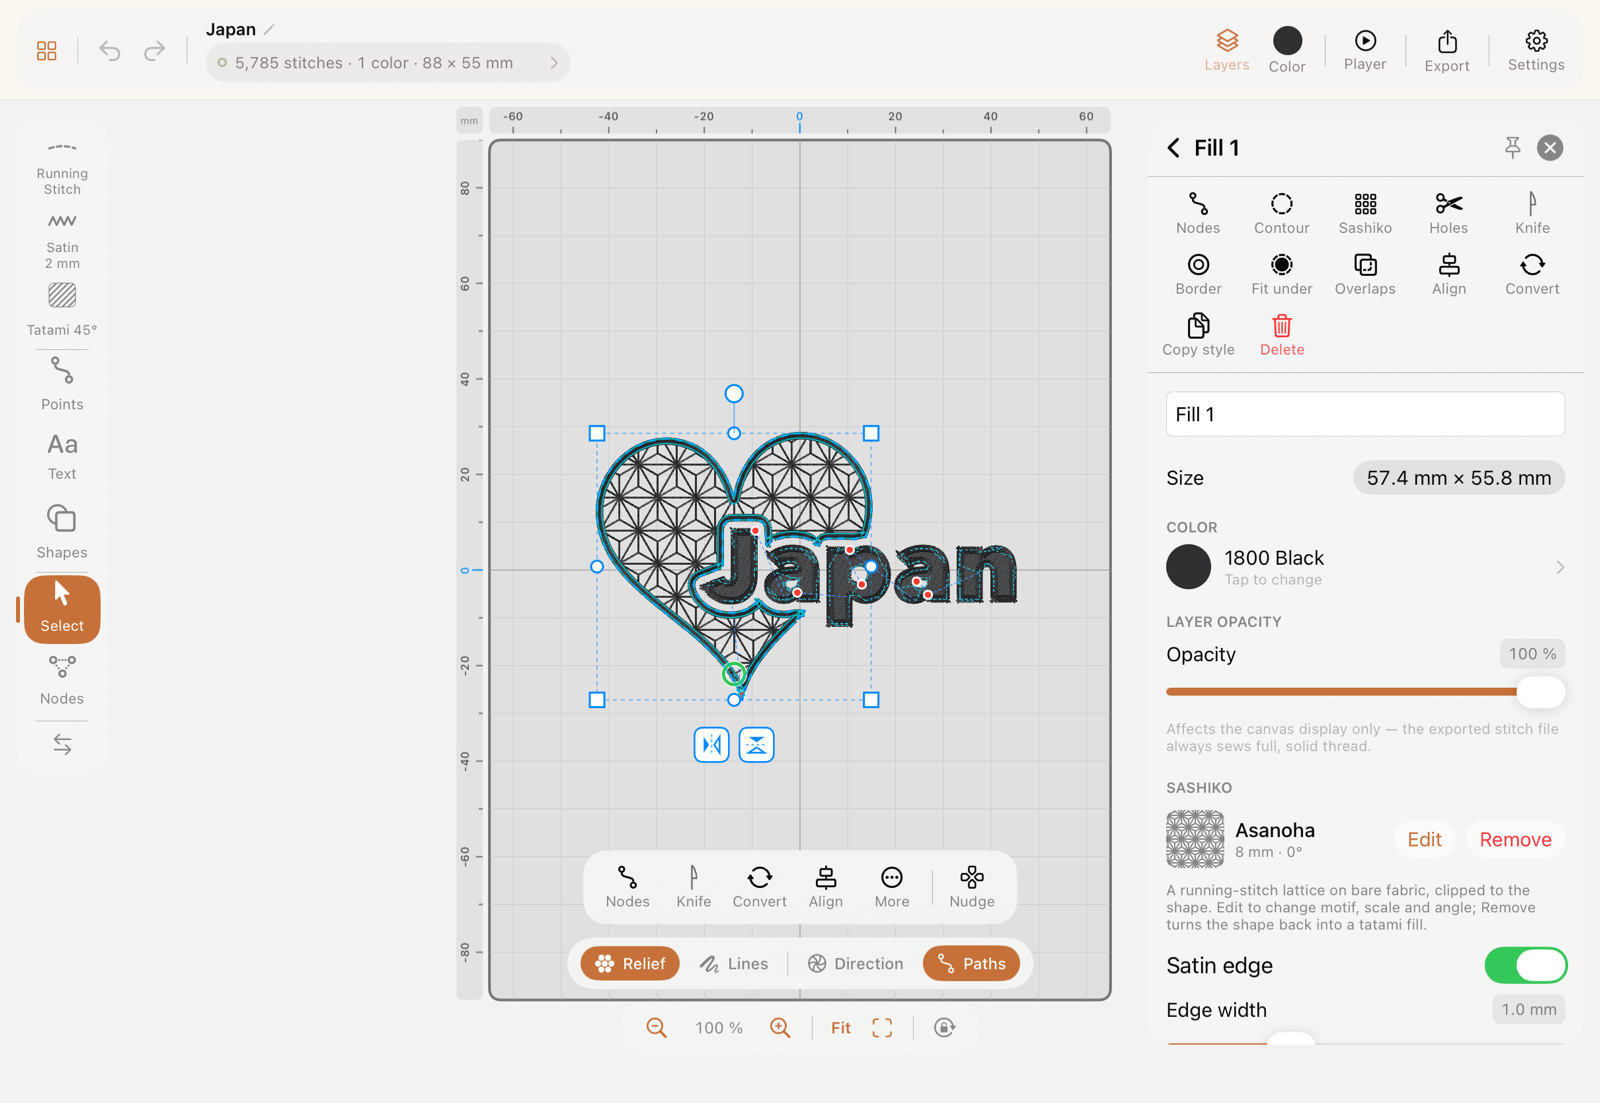
Section titled “How do I change a Stitch’s settings after it’s already drawn?”Switch to Select, tap the object, and its inspector opens with every parameter live-editable — drag a slider and the stitches on canvas regenerate immediately, so you’re always looking at the real result, not a preview. This is the same inspector regardless of whether the object came from a built-in preset, one of your own, or was drawn from scratch.
Sliders are not the only way in. Tap the number beside a parameter and a keypad opens right there: the current value, the unit, and the range the parameter allows, before you change anything. Type 3.8 and it stays 3.8 — no dragging for a value you already know. A number outside the range is not refused, it lands on the nearest value the parameter can hold. The iPad keyboard never comes up, and the slider stays visible next to the pad.
What do the common parameters actually mean, kind by kind?
Section titled “What do the common parameters actually mean, kind by kind?”The three kinds don’t share one parameter set — each solves the “how densely do I cover this with thread” question differently:
| Kind | Core parameters | What they control |
|---|---|---|
| Run | Stitch length, Passes | How far apart needle penetrations sit along the line; how many times the line is re-stitched (3+ passes = bean stitch) |
| Satin | Width, Density (auto), Pull compensation | How thick the zigzag column is; how tightly packed the zigzags are (follows width automatically); how much the digitizing widens to counter fabric pull |
| Fill / Tatami | Angle, Density, Stitch length, Pattern | The compass direction of the scanline rows; the spacing between rows; the spacing within each row; the row-offset pattern (Diagonal/Brick/Scatter/Wave/Chevron/Ring) |
| Sashiko | Motif, Scale, Angle, Stitch length | Which lattice pattern covers the shape; the lattice cell size; its rotation; the running-stitch spacing along the lattice lines |
The throughline across all of them: too dense wastes thread, slows the machine, and can stiffen or even tear lightweight fabric; too sparse looks thin and may leave gaps in coverage. Every default preset is tuned to a sane middle ground — the built-in presets are a safe starting point precisely so you don’t have to find that balance from zero.
Do all kinds have underlay, and where is it?
Section titled “Do all kinds have underlay, and where is it?”Satin and Fill do; a Run has nothing to stabilize, so it doesn’t. In both cases it’s an Underlay toggle in the object’s inspector with an Auto / Light / Standard / Firm / Custom ladder — same names on both, but different passes underneath, because a column and an area need different support. The details are on the Satin and Fill pages.
If you never touch it, Auto follows your design’s Target fabric, which is the right answer for most work.
Where does an object start stitching?
Section titled “Where does an object start stitching?”At its entry point — the little green circle that appears on the outline whenever the object is selected. StitchPencil picks it automatically (hollow ring), and you can drag it anywhere along the outline to pin it yourself (filled circle). It’s worth knowing about because it decides where the object’s one visible seam ends up. See Select & transform.
Does opacity or color count as a “Stitch” setting?
Section titled “Does opacity or color count as a “Stitch” setting?”Color and Layer opacity exist on every object regardless of kind, but they’re not part of the generation recipe — color is which thread it sews in, and opacity is a canvas-preview-only dimmer (the exported file always sews full, solid thread). See Color & thread and Layers & sequence.
Below is a Fill object’s inspector — note how the Sashiko section, Satin edge toggle, color and opacity all sit together in the same panel described above: