
Satin — Width, density and edge behavior
What is the Satin tool for?
Section titled “What is the Satin tool for?”A zigzag column of stitches that fills the width of your stroke — the classic look for letters, borders and thick outlines. Draw a stroke and StitchPencil builds two “rails” (the column’s edges) from it automatically.
Satin also comes the other way round: draw a closed outline and let the shape decide the width. That is the satin area — for pupils, leaves and petals.
What does “Width” control, and is density automatic?
Section titled “What does “Width” control, and is density automatic?”Width is the column’s thickness in millimeters — the distance from one rail (edge) to the other. A narrower column reads as a fine line; a wide one reads as a bold, solid band. Density (how tightly the zigzags are packed along the column’s length) follows the width automatically via auto-spacing — a wider column gets proportionally wider stitch spacing so it doesn’t become absurdly dense, without you having to tune the two independently. In practice this means: change Width, and the column simply looks thicker or thinner while staying visually consistent — you don’t also have to hunt for a matching density value.
Width runs from 1 to 20 mm. No machine format carries a stitch much longer than about 12 mm in one throw, and in practice a stitch much over 10 mm snags. So a wide column is sewn as a staggered split — several narrower passes side by side, their penetrations scattered so they don’t line up as a seam. Corners chooses how a column without lines turns a sharp corner: Mitred builds one column around it and caps a long point, Pointed runs the outer edge through the very point you drew and fans the stitches from the inner corner, the way a satin outline ends the tail of a ribbon — and the point lands exactly where the pen put it, at any width, a 1 mm line included. A very narrow V, under about 20°, would fan into stitches several widths long; it closes as a smooth wedge across both outer edges instead. Longest stitch in the inspector lowers that limit for one column or satin area — 6 mm keeps a wide column from snagging on knits, at the price of a seam line of penetrations down its middle.
Over foam the split holds off as long as it can, to 12 mm, because a penetration in the middle of a puff column compresses the dome instead of spanning it. Past 12 mm even a foam column is split, and it will come out flat down the middle — the design check warns you before the machine does.
What are direction lines, and how do I draw them?
Section titled “What are direction lines, and how do I draw them?”A satin stitch normally stands square across the column, like the rungs of a ladder. A direction line tilts those stitches. You draw it like a single stitch, and the stitches take its angle.
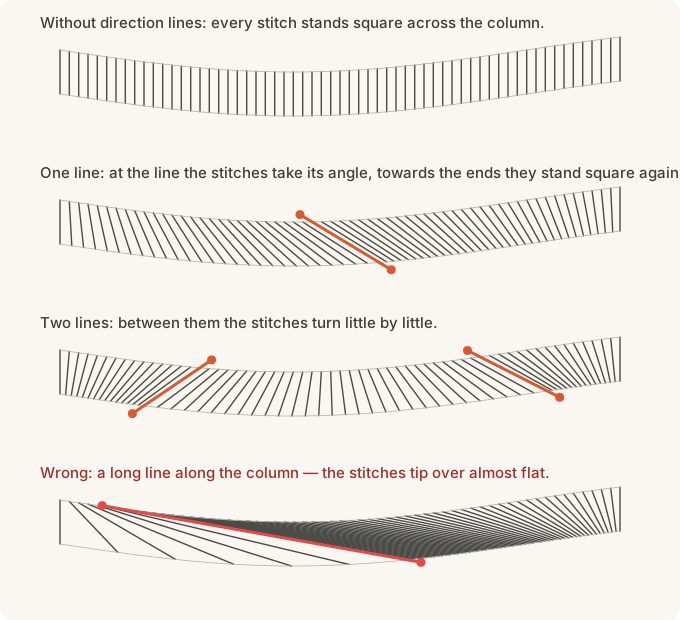
How to draw one:
- Select the satin. Direction lines are offered on a column from 1.5 mm wide and on every satin area.
- In the inspector, tap Draw direction line.
- With the Pencil, draw a short stroke across the column, from one edge to the other. Draw it as if it were one stitch, at the angle you want.
- If the angle should change along the column, draw another line further on. Between two lines the stitches turn little by little.
- Tap Stop drawing.
The start and the end of the column always stand square. Between an end and the nearest line, the stitches turn into the line’s angle.
Keep each stroke short and across. A long stroke drawn along the column still touches both edges, so it is taken, and the stitches near it tip over almost flat, as in the red example. A stroke that misses an edge is not taken, and the app says so.
To change a line, tap Edit and drag its dots. Delete removes all lines, and the column goes back to square stitches.
Direction lines are for a ribbon that should look twisted, the vein direction of a leaf, or the tail of a bow. A plain column does not need them.
What is pull compensation, and why does it scale with width?
Section titled “What is pull compensation, and why does it scale with width?”Stitching pulls fabric in slightly along the direction of the zigzag, which can make a satin column look narrower on fabric than it does on screen. Pull compensation widens the digitized column very slightly to counter that — and it scales proportionally with column width, since a wide column pulls in more than a thin one.
What do the underlay firmness options mean?
Section titled “What do the underlay firmness options mean?”Auto / Light / Standard / Firm / Custom — the underlay is a lower stitching pass that stabilizes the fabric before the visible satin top-stitching goes down. Firmer settings add more underlay stitches for stretchier or looser fabrics.
- Auto — narrow columns get a center run plus a zigzag; wide ones add an edge run along both rails. Where that threshold sits follows your design’s Target fabric.
- Light — center run only.
- Firm — the full stack (edge run, center run, zigzag) at any width.
- Custom — you pick the individual passes yourself.
When should I use Custom underlay?
Section titled “When should I use Custom underlay?”When a specific column needs something the ladder won’t give you — a wide column with only an edge run, say, or a zigzag with no center run underneath. Switching to Custom opens toggles for the three underlay types, and it opens them already showing whatever the ladder was building for that object, so you start from what you have rather than from a blank slate.
The stack always sews in the same order regardless of the order you tick the boxes: edge run, center run, zigzag. Very narrow columns still drop the zigzag automatically — at that width it would only produce loose strays.
What does 3D Foam / Puff mode do?
Section titled “What does 3D Foam / Puff mode do?”Stitching over embroidery foam is not a satin setting any more — it is a puff section, a layer group that owns the foam and everything it needs: the placement outline, the machine stop, the tack run that perforates the foam, the cover density, and the decision at every open end. Select your columns and use Convert → 3D Puff.
It has its own page: 3D Puff — stitching over foam.
Wide satin without foam is a separate thing: above the normal threshold, wide columns automatically get a staggered split (several narrower passes instead of one very wide one) so they stay stitchable.
What is Accordion fading?
Section titled “What is Accordion fading?”A second colour made of fabric instead of thread. The stitch spacing travels along the column from your set density to a looser one, so the cover opens up and what shows through the gaps is the material you’re stitching on. One thread, one width — only the rhythm changes.
Five rungs in the Fading picker, no curve editor: the shape lives in the profile, and all you pick is which way the column opens.
- Off — an ordinary satin column, unchanged.
- Fade out — opens toward the end of the column.
- Fade in — opens toward the start.
- Both ends — dense at both ends, open through the middle.
- Feather — opens in bands, which reads as fur or feathers.
Three things follow automatically once a fade is on:
- Auto spacing steps aside. It exists to keep density even as a column widens; with a fade the unevenness is the effect.
- The underlay thins with the cover, by the same proportion rather than by a fixed amount, so it never stays dense under a stretch that is meant to open.
- The underlay stays out of the open stretches. Support that shows through the gaps would defeat the whole thing, so the open zones get none — and where a hidden stretch is long enough to be worth its own thread, it is sewn as a separate pass and the machine trims before travelling to the cover.
Because the fabric is doing half the work, this needs contrast: a fade over thread-coloured fabric shows nothing.
What is a feathered edge?
Section titled “What is a feathered edge?”Fur, grass, a brush, the fringe of a scarf. With Feathered edge on, the stitches on the chosen edge of the column wander in and out around it, each a different length — the column keeps its width, it just gets restless. The zigzag, its density and the underlay stay exactly as they were — only where the needle lands on that side changes.
- Reach — how far the fringe swings around the edge, half outward, half inward.
- Raggedness — at 0 % the fringe swells and ebbs in a soft wave along the edge; at 100 % every stitch has its own length, the spiky look. In between, a mix.
- Side — both edges, or only the left or the right one. Left and right follow the direction you drew the column in (the Nodes tool shows it); it stays put whatever order the design is sewn in. On a closed shape that means inside or outside: if the fringe lands on the wrong side, pick the other.
- New variation — rolls the dice again. The pattern is stored with the design, so a reload sews the same fringe.
The same setting on a group frays every column of the group alike. Over foam the fringe is ignored: long stitches past the edge would tear the dome open. A fringe adds no stitches, but the fringed ones are longer — a wide reach on a wide column can meet the longest-stitch limit, and the app then splits them.
Can a whole word fade instead of each letter?
Section titled “Can a whole word fade instead of each letter?”Yes — that’s the difference between setting Fading on a single object and on a group. A per-letter fade looks like a mistake rather than an effect, so when you set it on the group, the fade runs across the entire group along its longer side and the letters open one after another.
When is a satin a line, and when a column?
Section titled “When is a satin a line, and when a column?”The width slider alone decides:
- Up to 1.5 mm the satin is a line. A narrow zigzag that follows your curve. No underlay, no mitre. At a corner the zigzag simply turns with you. A spike runs out to a point, the way a satin font does it: the stitching stops at the point you drew, nothing reaches past it, nothing is sewn twice, and no knot forms. With Corners set to Pointed, a sharp junction of the line is sewn like the tail of a ribbon instead: outer edge through the point, stitches fanning from the inner corner. Direction lines are offered from 1.5 mm on: a line has no edges for a rung to span.
- From 1.5 mm on the satin is a column. Now everything in the next section applies: underlay, and corners and spikes are sewn as one column around the corner.
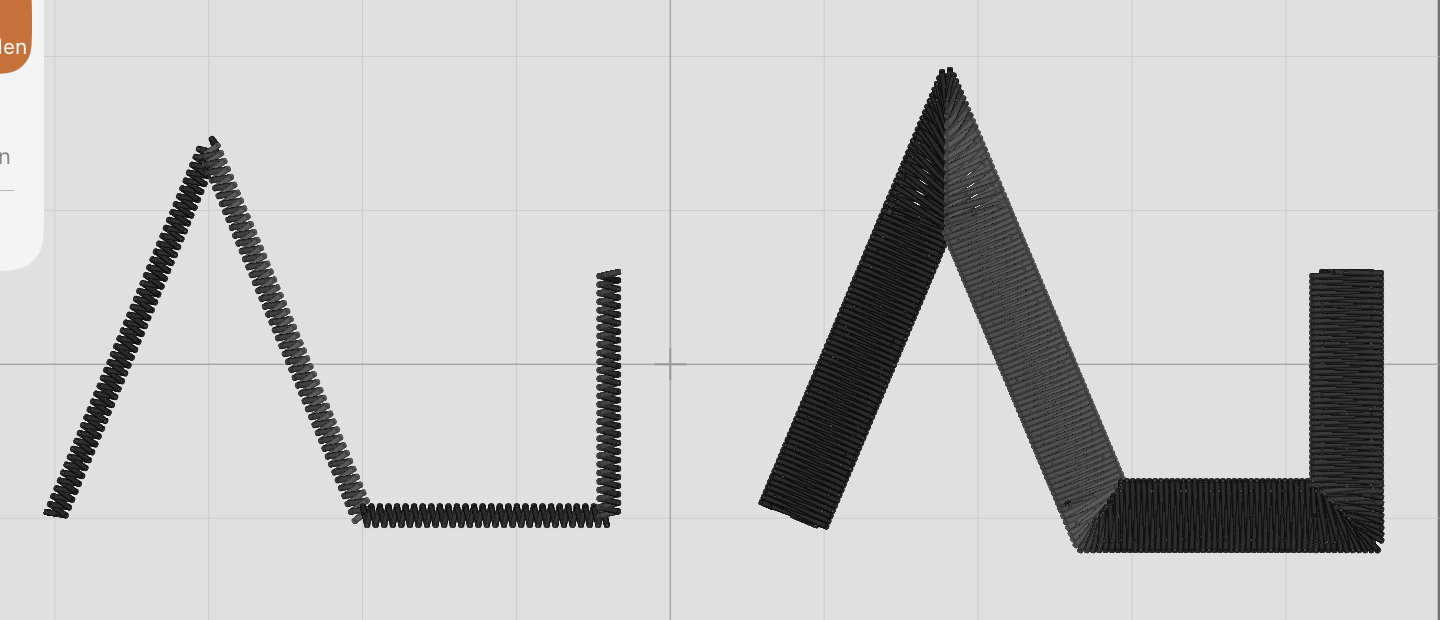
Three things hold for both:
- Pull compensation stays on. A 1 mm line therefore sews about 1.2 mm wide, just as the machine makers’ own thin satins do.
- The inspector says which one applies, right under the width slider: line or column.
- A column always stays a column when you set its width per node or drew the band with pressure. Even under 1.5 mm.
What happens at a tight curve or sharp corner?
Section titled “What happens at a tight curve or sharp corner?”Everything below holds for every satin column wherever it came from: drawn, a border or contour around a shape or a word, or a fill’s satin edge.
Three things, all automatic.
Short-stitching de-stacks the inner edge of a tight curve or cap, so stitches don’t pile on top of each other.
A corner is sewn as one column around the corner — the way the desktop programs sew it, measured against Hatch on 2026-09-25. The two legs stop where their bands begin to overlap. From there the outer penetrations walk around the outside of the corner at the normal spacing, through the tip and down the other leg, while the inner penetrations sit on a short line in the corner’s bisector, each set back a little from the last so nothing piles up. One layer everywhere: no leg is sewn twice, no star of long stitches sits on the tip, and the underlay runs once through the corner.
- The tip is where the two outer edges cross, so a moderate corner and a star’s ray come to a point. A sharp spike would have to reach far past the drawn vertex for that, so it is capped at two and a half half-widths, in a flat about a third of the band wide — exactly what a hand digitiser does at a spike.
- A drawn stroke up to 1.5 mm is a line, and its spike is one wedge column instead (see above).
- Over 3D foam the corner stays blunt: a tip of thread beside the dome would perforate the foam.
- A closed ring with corners (a border, a satin edge, a hexagon as satin) sews like a single column: the whole underlay once around first, edge run, centre run and zigzag each as a round back to the seam, then the cover in one go over every leg and corner. Not underlay, satin, underlay, satin from corner to corner — the same as a ring without corners, and the way the desktop programs sew it. An open column with corners, a letter say, still sews piece by piece, because its cover has to start where the underlay does not end.
You switch nothing on, and there is no setting to get wrong. A warning appears only when the column is genuinely too wide to bend around a curve that sharp — the inner edge would pinch into a starburst. It says the radius it measured, and it can mark the spot on the canvas.
Why does the width slider stop, and what is the orange part of the track?
Section titled “Why does the width slider stop, and what is the orange part of the track?”Two different limits, and they mean different things.
The orange zone is the outline limit — a mark, not a wall. Past it, a band this wide stops edging the shape and starts covering it: the arms of a star meet in the middle and the outline reads as a solid blob. The slider still goes there, because a deliberately fat band is a legitimate choice, and a caption under it says what is happening — for a genuinely solid shape a Tatami fill is the cleaner way to get there. Where the mark sits depends on the shape: a 40 mm star runs out of room at around 6 mm, a circle of the same size not until well past 30.
At a corner the column keeps its point. Where two straight stretches meet, the two outer edges are carried on to where they would cross and the wedge between them is filled — the corner of the artwork is sewn, not rounded off. A corner too sharp for that (the apex of an M, a star ray) is cut back to a bevel at one and a half times the half width, because a longer spike is thread standing on almost nothing. Over foam the corner stays blunt on purpose: a spike out there perforates the dome away from the column, and the end bar would sit out there with it.
The hard stop is the corner limit, and there the knob really does refuse. The sharpest corner in a closed shape can only carry so much band before the geometry stops being buildable — on that same 40 mm star, around 10.7 mm. Push the slider against it and it stays put; on release a message says “Width stops at 10.7 mm — the corners cannot carry a wider band.” Typing the number in gives the same answer, and this is the reason a shape no longer degenerates into an undefined blob when you keep dragging.
Shapes with no sharp corners have no hard stop at all — a hexagon’s 120° corners never bind, and its slider runs the full range.
If I scale a satin object, does the band get wider?
Section titled “If I scale a satin object, does the band get wider?”No. A band whose width is a setting — the uniform ones the Shapes tool and ordinary drawn rings produce — keeps its millimetres when you scale the object. Drag a 3 mm star from 44 mm across to 60 mm and it is still 3 mm of satin; only the shape grew. That is what the machine cares about, and what the desktop programs do.
The exception is a band whose width is the drawing: a pressure-drawn stroke, per-node widths set in the Points tool, and lettering. There the width is part of the artwork, so it scales with it.
Density, stitch length and pull compensation are physical millimetres in every case, so they never scale — the stitch count adapts by itself.
How do I control exactly where the satin rails run, point by point?
Section titled “How do I control exactly where the satin rails run, point by point?”Switch to the Points tool and use its Line vs. Pairs chip — Pairs lets you place the two rail edges independently instead of deriving them from a single centerline stroke.
How does Satin relate to Sashiko?
Section titled “How does Satin relate to Sashiko?”A closed satin border can host a Sashiko fill underneath it as one combined action — but an open satin path can’t; you’d convert it to a fill first. See the Sashiko page for the exact rule.
Can I turn a satin column into running stitches along it?
Section titled “Can I turn a satin column into running stitches along it?”Yes — Convert → Run, which asks how many, up to six.
1 Run (centre) is what Convert → Run always did: one line down the middle. Ask for more and they spread evenly across the band’s width — three sit at a sixth, a half and five sixths across it.
The lines follow the column’s own rungs, so they hold their spacing around a curve and through a mitre — where offsetting a centreline would fold over itself on the inside of the bend. None of them sits exactly on a rail, because a run sewn on the edge of a shape reads as a wobble and falls half outside on a curve.
Use it for a quilted look, for a stroke shaded with two or three passes, or for a band too wide to sew as satin on the fabric you have.