
The editor at a glance — What does everything do?
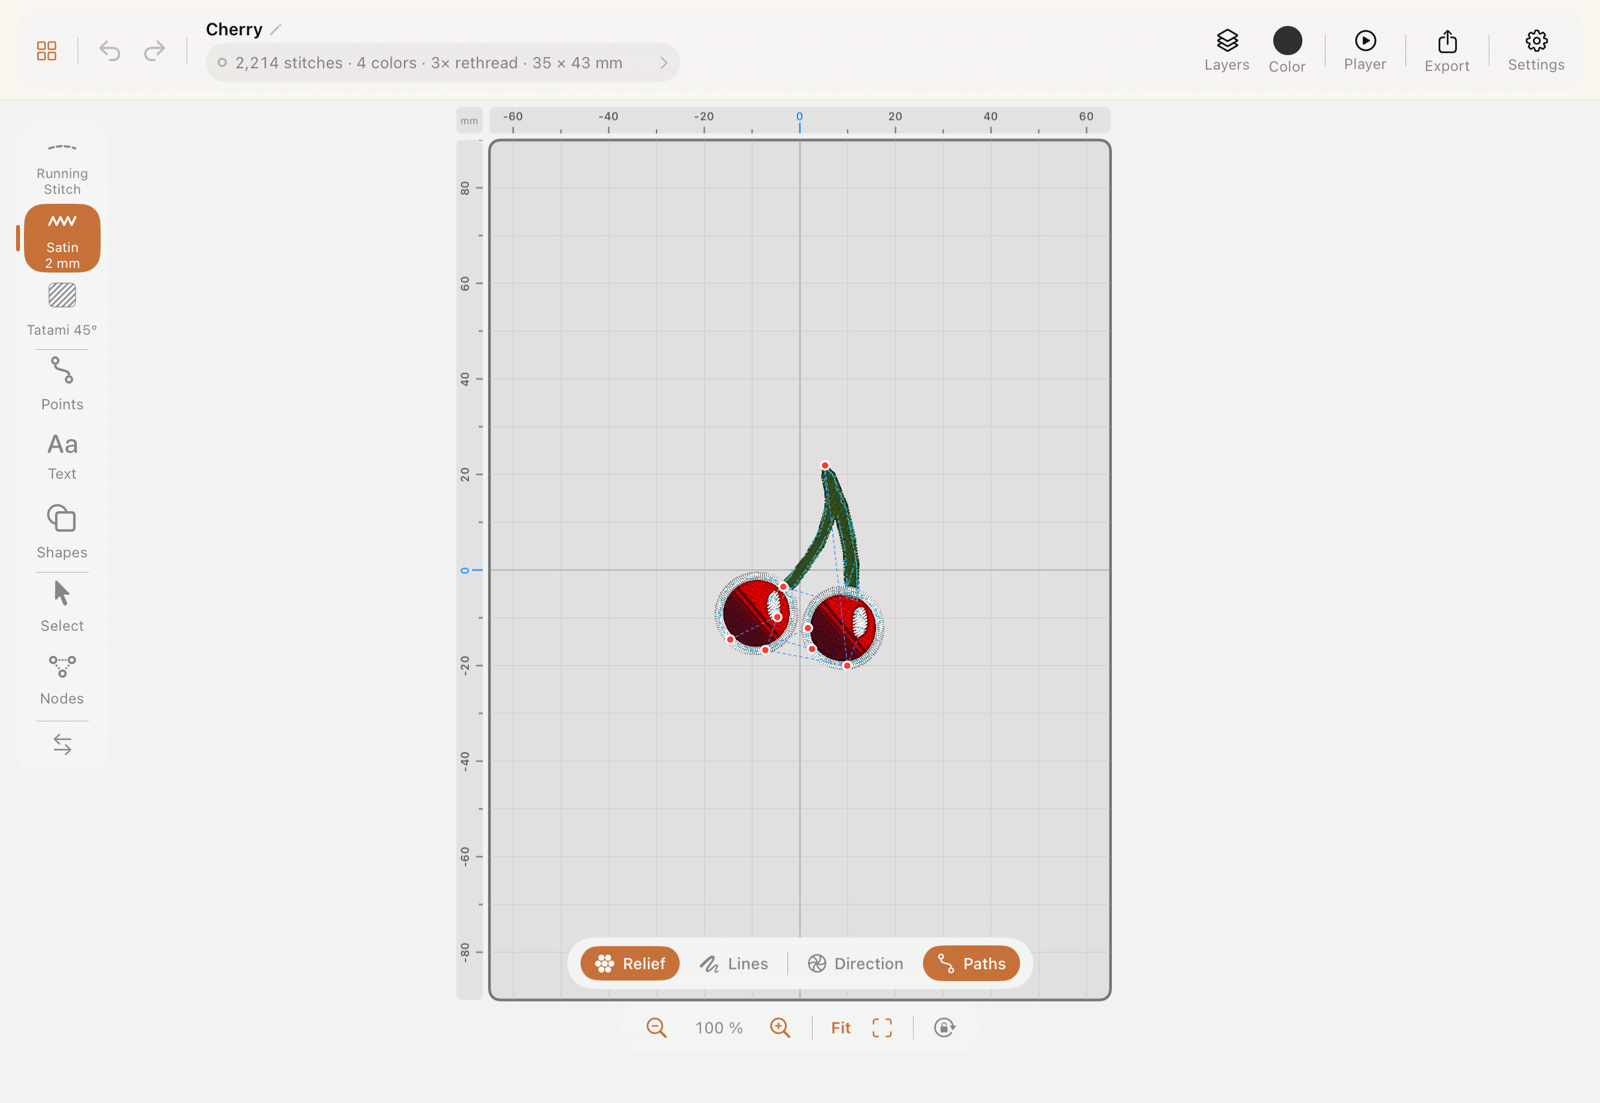
The editor has four zones: a top bar, a tool rail on the side, the canvas in the middle, and a floating zoom / display bar along the bottom. Which side the rail sits on depends on your handedness setting — everything below reads the same either way.
What’s in the top bar?
Section titled “What’s in the top bar?”From left to right:
- Grid icon — back to the Gallery
- Undo / Redo arrows
- Design title — tap it for the design’s details (name, author, notes); the status chip with stitch count, colors and size sits right under it
- Status chip — a coloured dot plus a one-line summary (stitch count · color count · design size), and a button: tap it to open the design check described below. With something selected, the chip leads with the selection’s size instead (Selection 15.3 × 19.4 mm · stitch count) — for an object, a group or a box selection alike
- Layers — opens the layers/sequence panel
- Color — the current drawing color swatch; tap to open the color inspector
- Export — opens the Export Center
- Settings (gear icon) — opens Design settings for this design (hoop size, units, grid, fabric…). This is a different settings screen from the app-wide one in the Gallery.
What is the design check?
Section titled “What is the design check?”A report on whether the design will survive being sewn. Tap the status chip — the same pill also sits at the top of the Export Center, right before a file leaves the app — and it opens.
The dot is a traffic light showing the worst thing found, never an average:
- Green — density, stitch lengths, layering and machine limits all look fine.
- Yellow — it will sew, but something is worth a look.
- Red — either physics says no (enough thread piles up in one place to deflect the needle), or a machine limit is broken.
Only the machine limits actually stop an export, and those rows are marked “blocks export”. Everything else is advice: you decide whether to export it.
Every row carries a measurement and a remedy — “Fill 3: denser than you asked · set 0.35 mm, actually 0.24 mm” tells you what to change, where a score out of a hundred would not. Tap a row to jump straight to the thing it is about: the object is selected and the canvas frames it, so a finding about one column in a crowded design does not leave you hunting for it.
Some findings are about a place rather than an object — thread stacking happens in the overlap between objects, so there is nothing single to select. Those rows jump too: the canvas frames the worst place, outlines the places of that one row in its colour, and checks the objects that meet at the worst one in the Layers panel. Only the row you tapped — marking every row at once answers no question, it just lays boxes over the design. Zoom out with Fit to see that row’s outlines together.
What does the design check actually look at?
Section titled “What does the design check actually look at?”The rows that belong to one feature are explained on that feature’s page: 3D puff, Trapunto and satin areas. The rest, in order:
-
Density — the cover stitches of each fill on their own, against the spacing you set. Underlay, satin edge, lock stitches and pull compensation are excluded, or every small framed shape and every small letter sewn in several pieces would read as far too dense; the members of a gradient blend are counted together, or each would look half empty.
-
Stitch length — how much of the design sits at the very short end, where thread frays and needles suffer.
-
Travel — what share of the plan is thread crossing the face of a shape rather than covering it. Connections that hug a fill’s own outline are not counted: they ride in the row-end penetrations, where they neither show nor add bulk. Only the ones cutting across the middle can telegraph through the cover, and those are what the finding is about.
-
Trims and colour changes — how many times the machine stops, and how often you rethread. The trims row also says which colour causes most of them and how many separate strokes it is drawn from, because every separate stroke ends in a cut. Where those strokes touch, the row suggests Join and names the saving — it tests that against the real geometry first rather than hoping. Where they do not touch, it says so just as plainly: joining would not remove those cuts — the thread cannot reach the next stroke under cover, so a joined group cuts there too, to protect the look. The durable lever is drawing fewer, longer strokes.
-
Long uncut jumps — thread left lying across bare fabric. A jump the machine cuts before making is not counted: that costs a tail to clip, not a thread across your design. The finding also says whether the worst jump runs between two objects (re-order them) or inside one (look at where the object starts, and at underlay or accordion fading, which sew in a separate pass and have to travel back).
-
Thread on the fabric — a sewn connection lying on bare cloth with nothing over it. This is the one finding that catches a decision as well as a fault: Thread to next object → Run sews a visible connection on purpose, at any distance, and nothing else in the app says it is set — Paste style even carries the setting along to whatever you paste it on. The check measures the plan instead, so it reports the same thing whether you asked for it or a later shape moved off the connection. Connections hugging a shape’s own edge are not counted, and neither is thread running under something stitched later — that is what hiding means.
-
Very small shapes — anything that will sew as a knot rather than a shape.
-
Layers of thread — measured on the actual stitch plan, not on outlines: overlapping shapes that end up covered are harmless, and what breaks needles is thread on thread. The report counts places, not just the worst one, so fixing one makes the number go down instead of promoting the next place into an apparently new finding.
A layer is thread, not presence. For each object the check measures how much thread it actually lays down at that spot. A satin rung or a running stitch that only clips the corner lays a single thread — that is not a layer, it is yarn on its way somewhere else, and it does not count as one. Otherwise a thread passing through would weigh as much as a full tatami cover, and places would turn red that feel perfectly fine.
The rows, filed by cause — because a count tells you how bad it is and never what to do about it:
- Thread piles up — the red row. Enough layers in one spot to feel, and to push the needle off line. The advice follows what is actually there: the same colour over itself (a stroke drawn along an existing one) wants shortening or redrawing; a fill buried underneath can go with Overlaps; where different lines cross, shorten the one underneath so it ends inside the crossing — it is covered there anyway, so the picture does not change.
- Hidden stitches — a fill ends up underneath later stitches. Select one of the checked fills and press Overlaps. What stays under the covering object is the overlap margin from Design settings: trimmed flush, the two edges would pull apart on fabric and a gap would open.
- Lines meet — outlines and details cross. This is an info row, not a task: two lines that cross put two layers on that spot, and the only way to remove one is to leave a gap. Worth knowing for the next design — fewer, longer outline strokes mean fewer crossings.
- Fills overlap — neighbouring fills share a border. Also an info row: they are meant to overlap slightly, or a gap opens when the fabric pulls. The width of that margin is in Design settings.
Only the first two ask anything of you. The others sit below the real findings with an ⓘ and never colour the lamp.
The rule the whole report follows: a colour means there is something to do, an ⓘ means there is something to know. No row ever wears a signal and then tells you to leave it alone.
Each row also names the object involved in most of its places. On a hand-drawn design a handful of objects account for nearly everything, so that name is usually the answer to “where do I even start”.
Why does the check not report my seam?
Section titled “Why does the check not report my seam?”Because it is not one. The check has two tolerances, and both model what actually happens on fabric.
Too few layers. A fill, the neighbouring fill it shares a seam with, the border around them and one line crossing — that is the everyday case, and three of those the app puts there itself: the overlap margin pushes neighbouring fills into each other on purpose, or a gap opens as soon as the fabric pulls. A report that calls that a defect teaches you to ignore it. So it takes more than the everyday case before a place enters the report at all.
Too small. A needle punches a hole about half a millimetre across, and a 40 wt thread lies barely half a millimetre wide. Anything smaller than a few needle widths square is not a patch of fabric at all — it is a few stitches of overlap. If you punch your fills with a little inward offset so no fabric shows through the seam, that is exactly what you get, and it is intentional. The check does not nag about it.
One exception: a genuine knot is reported at any size. Bulk is an area problem — fabric goes board-stiff, and that takes area. A deflected needle is a point problem: enough layers in one spot and it wanders or the thread breaks, however small the spot.
Why is the dot sometimes a hollow ring?
Section titled “Why is the dot sometimes a hollow ring?”Because the check has not run since your last edit. It derives a second stitch plan to measure against, so it runs when you ask rather than continuously — and rather than show a green lamp it has not earned, it shows a hollow one. Tap it and it fills in.
What’s on the tool rail?
Section titled “What’s on the tool rail?”- Run / Satin / Fill — three quick-access tiles. Each remembers the last preset you used for that stitch kind. Tapping the tile that’s already active opens the Stitch Library popover instead of just re-selecting it — see Stitch presets & the HUD.
- Points — precision node-by-node digitizing, see Points & nodes
- Text — the lettering tool, see Shapes & text
- Shapes — curated starter shapes, same page as above
- Select — the arrange/transform tool, see Select & transform
- ⇄ at the very bottom — flips the whole rail (and every panel that docks beside it) to the other side. See Gestures for the full explanation.
How is the inspector organised?
Section titled “How is the inspector organised?”Every inspector reads in the same order, whatever you have selected — a single satin, a fill, a word, a group, a blend. Under the name and size a highlighted line says where you are: “Fill in “Boot””, “Letter “H” of “HERBST””, “Blend · 3 layers”, “6 Fill objects, grouped”. Then the sections, always in this order and always with the same names, a section simply left out when the object has nothing for it:
- What it is — only where there is more than the stitches: the text of a word, the layers of a blend, the foam of a puff section
- Color — the thread
- Stitch — the kind’s own recipe, with the kind as its caption (Stitch · Satin, Stitch · Tatami): width or angle, density, stitch length, passes, pull compensation, then spacing, fading, variation, texture, longest stitch, direction lines — in that order for every kind that has the row
- Underlay
- Edges — caps and corners, satin edge, pinned ends
- Add-ons — carving, a blend layer’s gradient, the section this object belongs to
- Machine — thread to the next object, lock stitches
- Layer opacity — display only, so it comes last
A group shows the same sections for all its members at once, and says so when they differ.
What’s the floating bar at the bottom of the canvas?
Section titled “What’s the floating bar at the bottom of the canvas?”One pill:
- View — the eye, first in the pill. It opens a small panel:
RelieforLines(Relief renders a realistic thread look; Lines is the flat schematic view used for digitizing), and under Show on top theDirectionandPathsoverlays, which add stitch direction arrows and machine travel paths. The eye turns orange while an overlay is on. It affects the canvas preview only, never the exported file. - Snap and the ruler — whether a dragged selection is pulled onto guides and grid, and a tape measure for two points.
- Zoom —
−/+, a live percentage, Fit (frames the current design, or the whole hoop if it’s empty), Actual size (the design as large as it will be stitched, measured against this iPad’s display — on an external screen only approximate), and a viewfinder icon that always frames the entire hoop regardless of what’s selected.
What are the short messages below the top bar?
Section titled “What are the short messages below the top bar?”Notices. When StitchPencil does something on its own behalf — narrows a satin because the band would close the shape, caps a width the corners cannot carry, fills a word with Tatami because your active Stitch does not suit text, undoes on a two-finger tap — a one-line message appears below the top bar for a couple of seconds and fades. A green check means: done as asked. A grey info mark means: the app decided something for you and is telling you what.
The message leaves a small capsule with a clock at the same spot for a minute; when several notices came in quick succession, the capsule shows their number. Tap it to open Recent notices: every message of this session, newest first, with when it appeared and how often in a row (six undos are one line, ×6). The list holds the last twenty, lives only in memory and empties when you leave the design — it is a place to read what you half-saw, not a log.
What does the ruler and grid show?
Section titled “What does the ruler and grid show?”The ruler along the top and left edges is in millimeters or inches depending on your design’s unit setting. The origin (0) is the hoop’s center — StitchPencil’s whole coordinate system is centered on the hoop, not its top-left corner, which matters if you’re ever reading raw coordinates off a design.